Remember when I said that I had been sewing like crazy during nap time this week? This is one of this things I've been working on...
Materials:
One pair blue jeans (or other pants)
Thread
Sewing machine
Jeans needle
Acrylic ruler
Tape measure
Scissors
Rotary Cutter and mat
Marker
Step One
Before you begin put a new jeans needle in your machine. Trust me on this one – it will make your life a lot easier later on when you try to sew through multiple layers of denim.
Next, darn any areas that look suspicious. You wouldn’t want the bag ripping apart the first time you used it, would you? I used the darning foot on my Bernina, lowered the feed dogs, and darned away.
Step Two
Sew the front pockets closed to prevent gaping. I used the longest and widest zigzag possible and just followed the curve of the pocket. You may prefer to use invisible thread or orange thread and go over the stitching that is already there. I did not sew closed the small change pocket.
Step Three
Next sew the fly closed. Zip the zipper, button or snap the pants, and turn them inside out. Use an edge stitch foot or a zipper foot to sew the flap behind the zipper to the front of the pants. I did not sew across the waistband; instead I started just below the waistband and sewed to the bottom of the fly. The button will still open and close as will the zipper, but the fabric is attached. Again, this was to prevent gaping and to insure my bag wouldn’t open unexpectedly.
Step Four
Lay the pants on a table and line up top of the jeans. Using the side seams for reference, line up the center front and back of the waistband. Line up the top edges of the waistband and pin.
Step Five
Lay the top section of the jeans out so they lay flat – don’t worry about the legs at this point. There will be some extra fabric right at the crotch, so that area will not lay flat. Just do the best you can. Measure down from the waistband to the center of the crotch. This measurement will depend on the size of jeans you started with. I started with size 38 x 30, so for me this measurement was right around 12 inches.
Step Six
In several places, measure down from the waste band that many inches and make a mark. Use your ruler to join these marks and draw a line across each leg of the jeans. I found it helpful to lay out and mark one leg at a time since I could not get both legs to lay flat simultaneously.
Step Seven
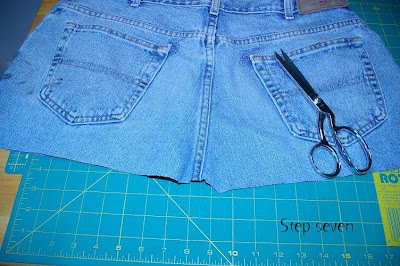
Using the line you just drew as a cutting line, cut off the legs of the jeans. Just go ahead and cut through both layers. Set these leg pieces aside and save them. You’ll need them later; one leg will become the bottom of the bag while the other will become the handles.
Step Eight
Neaten up the cut line by cutting off a little more fabric as needed. The back side of my jeans really needed a bit of cleaning up. You want this line to be fairly even, though mine ended up having a slight curve. (This will be a seam later on.)
Step Nine
Use a tape measure to measure across the cut end of the jeans. Try to stretch the fabric a bit when you measure so you don’t have a bunch of extra fabric when you go on to the following steps. For me the jeans were 25 ¼ just laying on the table, but they were almost 27 when I stretched them a bit. Set this top piece aside and write down the measurement.
Step Ten
Cut the bottom of the bag: Pick up one of the legs you cut off earlier and lay it out on your cutting mat. Fold the leg so that straight seam is on the side of the mat nearest to you. (On my pants that was the outside seam – the one that was not flat felled.) Line this seam up with one of the lines on your mat. Get out the measurement from step nine. Add one half inch to that number (this is your seam allowance.) Use your ruler and rotary cutter to cut off the crotch side and the foot side of the leg making the leg piece as long as your width plus one half inch. So for me, my measurement was 27 so I cut my leg piece 27 ½ inches long.
Keeping your leg piece nice and straight on your mat, cut off the inside seam – the thick flat felled one. Use your ruler and rotary cutter to cut off whatever fabric you need to so you end up with a nice rectangle. I cut of as little as I could so my rectangle was as tall as possible. (Sorry – I forgot to take a photo of this – so I tried to make a sketch to make this clearer.)
Due to the size of my mat, I had to fold the leg pieces in half to cut them. You may not have to.
Step Eleven
Sew the bottom of the bag: Fold the leg piece you just cut so the right sides are together. The one long side is already sewn. Using a one quarter inch seam allowance, sew up the two short sides. Now, three of the four sides are sewn - leave the last long side un-sewn. (Hopefully the diagram will make this clear.) This is where you will attach this piece to the top part of the jeans.
Step Twelve
Press the two side seams open. (The long seam will be serged so you won’t be able to press that one open.)
Next, make sure this piece (the bottom of the bag) is inside out. Fold it so that it lays flat, with the side seams laying on top of the long seam as shown in the photo. You’ll know you did it right if you have a triangle on each end with a seam running up the middle. (I hadn’t ironed my seams open yet when I took the picture.)
Step Thirteen
Give the bag a square bottom: Use your ruler and a marker to draw a line across the end of the triangle. I marked a line three inches up from the triangle point. Do this on both ends.
Step Fourteen
Sew across this line on both ends of the bag bottom. Make sure to anchor your ends securely!
This is what you should see on the inside of the piece after you sew:
Step Fifteen
Top stitch the sides of the triangle to give the bottom of the bag some strength. You could cut off the corner pieces, but I thought the bag would be stronger if I left the pieces intact.
(Inside of bag)
(Outside of bag)
Step Sixteen
Using the side seams to help you, find the center each and mark with a pin.
Step Seventeen
Sew the bottom and the top of the bag together: Putting right sides together, pin the top section of the bag to the bottom section of the bag. Match the pins to the center front and center back seams of the top piece. Also match the side seams. Stitch the top part and bottom part of the bag together using a one quarter inch seam allowance.
* If you look at my finished bag, you’ll notice a small pleat at the center front of the bag where the top and bottom are sewn together. That is there because I ended up with too much fabric as I was stitching the bag together; my bottom part was a bit too big, which is OK. Adding the pleat incorporated that extra fabric. I was worried that I would have too little fabric, so I really stretched back in step nine when I measured – that’s why I had too much. I figured it would be easier if I had a little too much fabric on the bottom piece than too little.
Step Eighteen
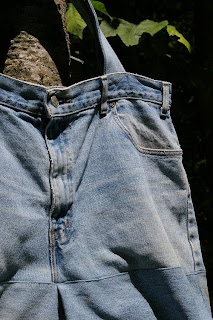
Press the seam toward the bottom of the bag then turn the bag right side in. Top stitch this seam down to add strength to the seam. Yeah! The body of your bag is now finished!
Press the seam toward the bottom of the bag then turn the bag right side in. Top stitch this seam down to add strength to the seam. Yeah! The body of your bag is now finished!
Step Ninteen
Make the handles: Get the last remaining leg piece. Use your scissors to cut off the seams. Take your time and cut close to the seams so you waste as little fabric as possible. You will end up with two pieces once the seams have been removed.
Step Twenty
In this step you want to trim the leg pieces so they are each a long rectangle. Working with one piece at a time, lay the piece on your cutting mat. (I folded it in half so it would fit on my mat.) Line up the fold and straightest side with the lines on your ruler and trim the long side.
Open up the leg. Is it srtaight, or is there a slight V shape like in the diagram below? If you got the V, you'll need to trim off a little more fabric at one end but not the other. (In the diagram below you would need to trim off at the ends but not at the fold.) I had to do this a couple of times before I had a truly straight side. Once you have a straight side square up the other three sides. Then do the same thing to the other piece and make their measuerments the same; you want them to be identical. Mine ended up being 8 inches by 25 inches.
Step Twenty One
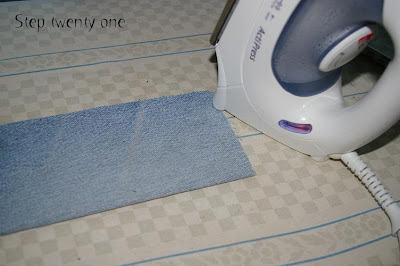
Fold each piece in half length wise – so you have a long skinny piece. Press.
Fold each piece in half length wise – so you have a long skinny piece. Press.
Open the fold. Then fold each side into the center. Press these folds.
Then, fold in half on that first fold and press agian. Open. This is what you should see:
Step Twenty Two
On each handle piece, fold each end in about ½ inch and press. My finished handles ended up to be 2 inches wide and 24 inches long.
Step Twenty Three
Top stitch all the way around each handle piece. I used orange thread.
Step Twenty Four
Position the handle. Don’t worry about the belt loops, but do worry about metal rivets – make sure you will not need to sew over them. The center of each of my handles is five inches from the center front (and back)of the bag. The bottom of each handle is 2 ½ inches below the top of the waistband.
I made sure to position the thick ends of my straps below the waistband. My Bernina can sew through thick layers, but six+ layers of denim was just too much for her…
Step Twenty Five
Stitch the handles in place. Stitch around the edge of the handle and then stitch an X from corner to corner to reinforce the handle.
That’s it – you’re done and ready to go shoping. Or, go find a toddler and take him (or her) for a ride. My son is almost four and about 40 pounds and he thought his two year-old sister would fit inside with him! I think I’ll stick to groceries…
If you make one of these, whether out of jeans or some other pants, I would love to know about it! Please let me know and I'll add a link to your post, photos, or whatever. Also, if any of the steps are unclear to you, email me and I will try to improve them.


13 comments:
Okay, you forgot the 1st step: LEARN HOW TO SEW! (o, maybe that's just me)! Very cool idea, though!
These are fantastic instructions! I made a blue jeans bag (much smaller - just one pocket-sized) for my DD's art supplies -- we call it her nature bag cause she uses it to store all the leaves and flowers she picks up. But I *love* your bag and the instructions. Mostly, I am in Shannon's camp but I may have to attempt this since the bag looks so beautifully functional! You rock.
Love the bag-- it's huge! I have a denim bag I started eons ago. It's all done but for the handles. Maybe this will inspire me to finish it.
Great bag!!! Thanks for the tutorial!
Wow you explain it really well, I had a thought what about making use of the pockets by acutally by turning the jeans inside out? That way you can use the pockets on the inside, and have a newer look with the unfaded fabric on outside. Also you can use ribbon to hide one or two of the inside out hems, giving that "it looks like this on purpose" feel.
Ah I wish I had a machine (and time and talent) like yours!
I love the photo with your son in the bag. my sister and I do that kind of stuff with my kids, too.
Very nice tutorial. Great way to recycle.
I wish I could whip this up but well, I'll just point some folks to this great tutorial :-)
I'm sensing a new grocery tote come this Fall, when I'll have time to sew. Thanks for the great instructions!
Very green. I was thinking while I was reading that MamaBird would like this post, and then I clicked on the comments and saw that in fact she did. It's good to see fellow swappers becoming blogging friends:)
Hi, I found your blog through BlogHer. The photo of your kid in the bag is cracking me up. I host a "blog carnival" about green crafting, the next issue will be posted at craftingagreenworld.com. I'd love to link to this post! Not republish it, just link to it and recommend that people check it out. Please let me know if that's ok with you. Email me at greencraftscarnival at gmail dot com if you get a chance.
Thanks!
What a wonderful tutorial,Just found you and also like to show a link to your tutorial this wed .
Thank you for the great blog your sharing with us!
hugs ginger
I made a bunch of these a few years ago, and I also used jean skirts. I called them Butt Bags. I lined mine with some soft fabric and sold them as diaper bags. They'll never wear out!
Post a Comment