This is my first tutorial, so bear with me. As a first-timer, if anything is unclear to you, let me know and I will try to clear it up. I know I probably didn’t take enough pictures… my apologies.
Materials:
photograph
paper
clear tape
transparency film (the clear plastic sheets for an overhead projector – not the ones for using in a printer – you want the ones for a copy machine)
paper-backed fusible web
thin permanent marker (Sharpie)
pencil
sharp scissors – a large and small pair
light table or window
Xacto knife (really sharp!)
rotary mat
iron & ironing board
background fabric (traditionally light)
silhouette fabric (traditionally dark.)
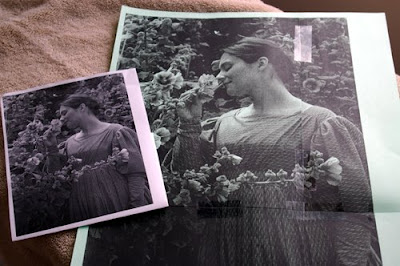
1. Start with a photo. The photo doesn’t need to show the face, but you want a photo with good definition of the person you want to silhouette. Notice in my photo how easy it is to see M’s outline (except by her one elbow, which I had to wing.)
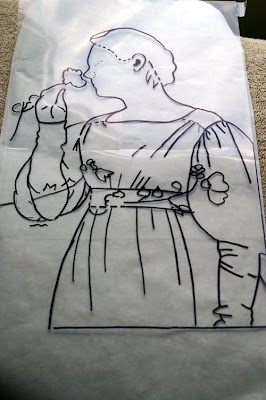
 3. Tape the pieces of the transparency film together to make a piece large enough to cover the part of the picture you want to use.Tape the photo enlargement to the light table or window so it won’t shift.Tape the transparency sheet over the paper enlargement. Make sure your entire image is covered by the transparency.
4. Trace the image with a permanent marker. Don’t use a water-base marker because it will smear. Trace the outline of the shape first. The go back and trace any other important lines inside the image. (These lines will give the silhouette detail.) Notice how I included her hairline, ear, and the folds of her dress. Some lines I traced with a dotted line since I wasn’t sure I was going to include them in the finished piece. But I thought “better safe than sorry” – if there was a chance I was going to use them later, I put them in.

6. When you are happy with your design, you are done with the enlargement of the photo.
Your transparency is now your pattern. FLIP the transparency UPSIDE DOWN and tape it to your light table. (Flipping it reverses the design so it will face the correct way when you iron it onto the background fabric.)
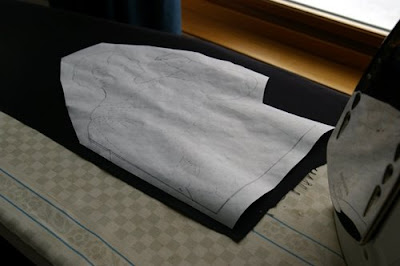
Place a piece of paper-backed fusible web paper side up over the transparency pattern and tape it down. Use a pencil to trace the design.
I found it easiest to trace the lines I was planning to cut along, such as the outside edge, with a straight line. I traced the interior lines, the ones I planned to use the Xacto knife to remove, with a dotted line. It really doesn’t matter though.
Occasionally, turn off the light and check the design. Once you have it all traced, turn off the light again and look at it. Does it have enough detail? Can you tell what it is supposed to be? Do you need to go back and add more interior detail lines? (Check out my first fabric silhouette. It doesn’t have nearly the detail as this one, and looking at it now, I think it needed more. Unfortunately my Xacto wasn’t sharp enough and it was the best I could do.)
7. Press your fabric and then use a lint roller to get off as much lint as possible. Press and de-lint BOTH sides of your fabric. Doing this now will save you frayed silhouette edges later. De-lint your ironing board cover now while you’re at it.

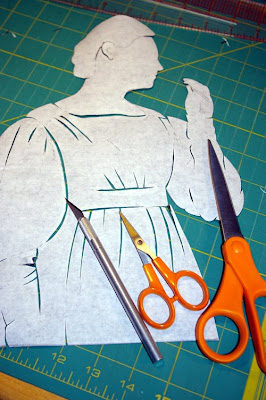
8. Now, you cut. I used my large scissors to cut all the way around the outside of the silhouette first. Hold the silhouette and pivot it as you cut, instead of your scissors. Cut with short even strokes. I left some of the small detailed places (like her hand) uncut and went back and cut them with my smaller scissors later. (They worked much better for the little details.) I also went back and used my little scissors to cut into the silhouette edges to show definition. I did this where her hair met her forehead and where her sleeve met her hands. It was easier to use the scissors since I could just cut in from the outside edge.
Once the outside is cut, lay the silhouette on your rotary cutting mat. Use the Xacto knife to cut thin slits along the interior lines. I just cut about a millimeter (or so) on either side of the line and then brought the two sides of the cut together into a point. This step was easier than I anticipated, though I must admit I did practice on some scrap first. Having a very sharp blade is very important! If the blade is dull, you’ll just fray the edges of the slit and it won’t look as good.

9. Press your background fabric and then gently peel the paper backing off of the silhouette. Position the silhouette on the background and follow the directions to fuse it into place. I also fused the flower – (Which I backed with fusible web and then cut out of a floral fabric.)
I chose to frame my silhouette so I did not finish the edges. If you were going to use it on a quilt, you would what to sew along all of the edges to prevent fraying. Be sure to sew along the slits in the interior of the silhouette too.
You’re done, yeah! If you make one I would love to see it - leave me a comment with the link so I can check it out. If you decide you like making these, be sure to pick up this book. While I used a different transfer method than she does, she has great advice on layouts, filling in missing photo parts, and the book includes several patterns you can use if you can’t seem to find your own. Good luck!


OMG!!! That is AWESOME...how long did that take you??
ReplyDeletei remember doing paper sillouetts in school for mother's day. your cloth one is very nice...i may have to try this out.
ReplyDeletespent the day outside in the SUN, got up to a whopping 62, it was great! i watched mark rake leaves. tomarrow i am going out to take photos of all the stuff rocketting out of the earth...hard to believe just one week ago today, everything was under at least two new feet of very heavy wet snow!
It's hard to tell how long it took - I can't get much done with a 2 and a 3 1/2 year-old around, so I usually work for short periods of time spread out over a number of days. But if I had to guess, I would say maybe five hours all together.
ReplyDeleteIt's beautiful Liz, great job!
ReplyDeleteSo, so pretty! That is such a sweet effect and I can think of tons of things to do with it! Thanks for sharing:)
ReplyDeleteThat is SO cool. I need to try that!
ReplyDeleteLiz, what a fantastic tutorial! Was flipping through the sample pages of that book and it's so interesting to see the use of black + colored fabrics.
ReplyDeleteThis is so pretty! Great tute, Liz. :)
ReplyDeleteLiz, you have a really great eye for projects like this. I'm always impressed!
ReplyDeleteHow awesome is that?!?
ReplyDeleteYou must have incredible patience...but W*O*W did it pay off*!*
Beautiful !
I can tell you are a teacher. Such great detail in your tutorial. It is very well done. I've bookmarked this to try someday. Thanks for all the work you put into this and sharing with us so generously.
ReplyDeletethis is just beautiful...I might have to give it a go :o)
ReplyDeletethank you so much for showing me how to go about it :o)
~simply~
Wonderful tutorial!! I have always wanted to know how to do this technique. Thanks so much for sharing. :-)
ReplyDeleteWhat a great tutorial! The final product looks amazing.
ReplyDeleteI NEVER thought of this! I do steps 1-6 often when I am doing a stitchery piece. But I transfer it to mulsin cloth instead...how cute is this? I am going to do this of my kids!
ReplyDeleteWhat an awesome tutorial! A must try! I have never seen anyone do this before! Very cool!
ReplyDeleteWow! That's pretty rockin. I love it!
ReplyDeleteThat is FANTASTIC! I love it!!
ReplyDeleteMy husband and I are hoping to get pregnant later in the year, and if we have a boy, his room will be in bumble bee's this would be AWESOME to do on the curtains to make it look as though there are bee's in the window!! How great!!
Thank you!!
Very easy to understand--I'm going to give it a try this weekend. Thanks for working this up!
ReplyDelete